Firstly as stated above either work your way through the tutorial or just download the solution as we are going to be working straight from that. When you open it and have a look, you will notice that all the code in located in the Game1.cs class. We are going to change that. Right click on your project and add a new class. Call it Map. Add your using XNA statements at the top and then inside the map class copy the following code from the game1 class.
We will keep those in the game1 class as well for the time being. Next we will create a constructor for the map class. before we go on make sure you add "using Microsoft.Xna.Framework.Content;" at the top of the class as we will need it next. Add the following just after the lines we just wrote.
We added the name overload here so we know the file we need to look for later on. We have content here to allow us to load the textures we will need. Next we will need to create a method that will load in the textures we need. We can just copy the code directly from the load content method in the game1 class. Add the following after the constructor.
Once you have written that go back up to your constructor and add a call to this method like this:
LoadTileTextures(content);
Now we will create our draw method. You can copy this code directly from the draw method in the game1 class. Skip a few lines between the constructor and the LoadTileTextures method and add the following.
LoadTileTextures(content);
Now we will create our draw method. You can copy this code directly from the draw method in the game1 class. Skip a few lines between the constructor and the LoadTileTextures method and add the following.
Next up we will add a file to load data from. Right click on your project and add a new folder. Call it MapLayouts. Then right click on that folder and add a new text file. Call it Level1. Now select Level1.txt and in the properties window(if properties window is not visible go to View>Properties Window) and set Copy to output directory to Copy Always. This is very important as if it does not copy all the time our program will not be able to see the file. Your folders should look something like this.
After that we need to set up our method for reading in the level file. Add another using statement at the top this time put "using System.IO;". After that create the following method.
After that we need to set up our method for reading in the level file. Add another using statement at the top this time put "using System.IO;". After that create the following method.
The first part of this method is for getting the width and height of the text file. File.ReadLines looks at our file and reads how many lines is contained within the text file, thus giving us a value for the height of the tileMap array. To get the width we have to do something a little more complicated. First we have to open the stream reader and read the first line. In our level file we will place a comma between the numbers.This gives us the character we need to split up the line and place each of those splits into a string array. We can then use the count of that array as the width of the tileMap array. Then we instantiate the tileMap.
Next we need to add more code into this method to replace the numbers in the tileMap array with the numbers in the string array. Skip a line after sReader.Close() and add the following code.
Next we need to add more code into this method to replace the numbers in the tileMap array with the numbers in the string array. Skip a line after sReader.Close() and add the following code.
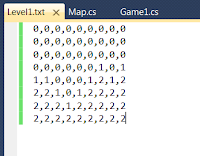
Before we go any further we need to add some data to the Level1.txt file. Double click on the Level1.txt file in the solution explorer and add some data like the following. Note: placement of the commas are very important. Be sure not to leave one at the end of the line or this will cause errors in our code.
Last thing we need to do is clean up the Game1 class go to it now. You can pretty much delete all the code we wrote in the last tutorial leaving only the code that was generated for us when we created the project. Up above the Game1 constructor just down form the spritebatch line add this line: "Map map;". Now skip down to the load content method still in the Game1 class. Once there add the following line.
That's it. If you see something like this then is has worked.
If you spot any typos in this post or have any problems please let me know. I have included a link to the source of this project below.
SimpleTileEngineUpdated.zip


