Wednesday, September 30, 2015

Squares Vs Circles now out on Android

I've been spending my time recently recreating and upgrading my Squares vs Circles game that I originally released on Windows phone. 

It's actually been on the play store for a little while now. That has given me plenty of time to find and fix any lingering bugs. Upgrades and leader boards are brand new features for the android version as well as many small graphical upgrades. 

It's been an interesting time, developing this game that is. It's made using the unity engine. I have been spending my time learning the engine since I left college and I love it. It's much quicker to get to the actual game mechanic scripting side of things with Unity as the engine is already there. With XNA you had to pretty much create your engine before you had any fun, but with unity you just get straight to it.

Anyway here's a link to the game. Give it a go and maybe give me a rating if you can.

Thursday, December 5, 2013

Unity Tutorial: Find the edges of the screen.

Recently I have been working on a 2D project in Unity. I came across a problem where I wanted the player to move a square on screen but not have the square disappear off the edges of the screen. It took a while to figure it out but eventually I managed to do it. I'm posting here in case anyone else come across this problem.

In this project you should set up a camera and an object you want the player to be able to move. Create a script and attach it to the object you want to move and open the script.

The first this we do is add the following line to the update method.
Here we pass in the transform of the moving object. ScreenPosition will contain values for the x, y, and z position of the object. These values will range from between 0 to 1. I found it easier to work with pixels so that's what we will convert it to now. Next we need to find the width and height, in pixels, of the screen. That's all the data we need to make sure the object always stays on screen. The next thing you need to do is check player input and then if the objects transform.position + movementSpeed is less that maxX/maxY and greater that 0.

Monday, December 2, 2013

Find the maximum screen resolution in Monogame or XNA

There are many ways to find the max screen resolution in XNA, however many of these do not work with Monogame. After some experimentation I have managed to find one that does.

The lines of code above should give you the actual width and height of the screen in pixels.

Saturday, January 26, 2013

Random 2D Terrain in XNA

I've been messing around with xna again recently after a brief spell with the UDK. I have been a long time fan of Terraira and was wondering how they managed to create the random terrain for their game. I searched around and came across this. The midpoint displacement algorithm. I tried doing this for a while to no avail. I was confident that I could get it to work given enough time however since going back to college I have very little time for side projects. This got me thinking, there had to be an easier way to do this. Instead of starting off with one line and then breaking it up into smaller and smaller ones, why not just start off small and use a similar technique to randomise the height of the next small line. This was the result.
The white line is the random terrain. I started off by stating the total map width. This is in pixels. Then I stated how detailed I want the map by giving a total number of points to be generated. I then  calculated how far apart the points should be by dividing the width in pixels by the number of points. I then generated the first line. I used the end point of the first line as the start point of the next line and generated a random height for the end point of that line within a certain predetermined range. Repeat this for as long as you want and you get the result above. It is also possible to get a better result by increasing the random height range.
The result is kinda cool. I may post source code someday but for now I will continue my experiments.

Update: As requested here is the source code.

Friday, January 25, 2013

XNA Tutorial:2D Shooting Part 2

A while ago I created a tutorial for shooting bullets out of a rocket in nay direction. The method used, while functional, is not very re-usable. In this tutorial we are going to re-factor the previous shooting tutorial. It is recommended that you finish this previous tutorial as we will be using that project.

Firstly you need to create a new game component. Call it ProjectileManager. This will be the place where we will manage our bullets. You need to ensure that instead of just inheriting from Microsoft.Xna.Framework.GameComponent change it to DrawableGameComponent as this will allow us to add a draw method to this game component.

You must then add a draw method to the game component just like the following. In here we will draw our bullets.

Next we will add a few variables and instantiate them in the constructor. As you can see, the list of bullets and the texture are both static. This is because we will be referencing them later is a static method. I'll explain further later.

Now we need to add an enum for bullet types. Enums are types that allow you to assign names to integer values. Add the following line to Bullet.cs file. Add is so that it is outside the bullet class. Next we will need to add a new property to the bullet class. This will be of type BulletType. We will need this if at some point in the future we create enemies that are capable of shooting back at the player. With this new property we will need to modify the constructor for the bullet class. We need to add a new parameter for the bullet type. Modify the constructor so it looks like this: Go back to the ProjectileManager. The next thing we need to do is add a public static method to add a new bullet to the bullet list. A public static method allows us to be able to access this method anywhere in the code. In this case by just typing ProjectileManager.AddBullet(methodParameters). Create a new method and make sure it looks like the following code. Next we need to be able to update the bullets in the projectile manager. We have pretty much already written this code in the rocket class all you really need to do is cut and paste the bullet update loop code over to the update loop of the projectile manager. Within the update for the projectile manager you should have to following code. Make sure you have also removed this code from the rocket class.

The exact same needs to be done for the drawing loop. Cut and paste the bullet drawing loop from the rocket class to the projectile manager draw method. The following code should now be in your draw method for the projectile manager. Before we continue make sure you no longer have code in the rocket class for updating and drawing bullets. You may also remove the list of bullets and bulletTex from the rocket class. You must also remove the bulletTex parameter from the rocket constructor and any other bulletTex code from the constructor. The constructor should now look like the following. next we need to use the new method we created in the ProjectileManager class. The rocket update method should now look like this: You may have notices that if you build your project you are still getting a few errors. We will work on fixing these next.

Go to the Game1 class. Go to the load content method to where we are instantiating the rocket. Remove the parameter for the bullet texture. It should now look like this. Next just above this line of code, still within the load content method, Create a new instance of the projectile manager. Now go down to the draw method in the Game1 class and move the spritebatch.end so that is appears after the base.Draw(). We do this to allow our projectile manager to draw with the same spritebatch. The base.Draw() updated the draw method of all the game components.

You should now be able to run the game. You may have noticed that the bullets are being drawn on top of the rocket. To fix this go back to your code. We must change the draw order. Go to the bullet class and to the draw method. change the last parameter to be less that 1.0f. I put it to 0.8f. Then go to the Game1 draw method and modify the spritebatch.begin method to look like the following. Now run the game and it should work perfectly.

Now the code is set up in such a way as to allow us to add enemies at some stage in the future. If you see any typos or mistakes please let me know.

Here is the source for the finished project.

Thursday, September 27, 2012

XNA Tutorial: Basic Tile Engine Part 2

I thought it was time to upgrade the tile engine we made in this tutorial. If you haven't done that tutorial then either work your way through it or just download the solution from the link at the bottom of the post (I recommend trying to work your way through it. It should only take a few minutes). Our old tile engine wasn't very good. The layouts of the map were hard coded and that's almost always a bad idea. So in this tutorial we are going to set it up to layout our map from a text file rather than a hard coded array and we are also going to re-factor our old code into a separate class.

Firstly as stated above either work your way through the tutorial or just download the solution as we are going to be working straight from that. When you open it and have a look, you will notice that all the code in located in the Game1.cs class. We are going to change that. Right click on your project and add a new class. Call it Map. Add your using XNA statements at the top and then inside the map class copy the following code from the game1 class.
We will keep those in the game1 class as well for the time being. Next we will create a constructor for the map class. before we go on make sure you add "using Microsoft.Xna.Framework.Content;" at the top of the class as we will need it next. Add the following just after the lines we just wrote.
We added the name overload here so we know the file we need to look for later on. We have content here to allow us to load the textures we will need. Next we will need to create a method that will load in the textures we need. We can just copy the code directly from the load content method in the game1 class. Add the following after the constructor.
Once you have written that go back up to your constructor and add a call to this method like this:
LoadTileTextures(content);

Now we will create our draw method. You can copy this code directly from the draw method in the game1 class. Skip a few lines between the constructor and the LoadTileTextures method and add the following.
Next up we will add a file to load data from. Right click on your project and add a new folder. Call it MapLayouts. Then right click on that folder and add a new text file. Call it Level1. Now select Level1.txt and in the properties window(if properties window is not visible go to View>Properties Window) and set Copy to output directory to Copy Always. This is very important as if it does not copy all the time our program will not be able to see the file. Your folders should look something like this.
After that we need to set up our method for reading in the level file. Add another using statement at the top this time put "using System.IO;". After that create the following method.
The first part of this method is for getting the width and height of the text file. File.ReadLines looks at our file and reads how many lines is contained within the text file, thus giving us a value for the height of the tileMap array. To get the width we have to do something a little more complicated. First we have to open the stream reader and read the first line. In our level file we will place a comma between the numbers.This gives us the character we need to split up the line and place each of those splits into a string array. We can then use the count of that array as the width of the tileMap array. Then we instantiate the tileMap.

Next we need to add more code into this method to replace the numbers in the tileMap array with the numbers in the string array. Skip a line after sReader.Close() and add the following code.
First we re-instantiate the sReader. This is to avoid getting errors when we loop through the lines and to make the logic easier. Next we create two for loops using the width and height we obtained in the top of this method. Inside the y loop we read a new line and split it up in to an array of strings like we did above. Then in the x loop we are inserting the number in the string array into the tileMap.

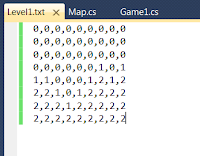
Before we go any further we need to add some data to the Level1.txt file. Double click on the Level1.txt file in the solution explorer and add some data like the following. Note: placement of the commas are very important. Be sure not to leave one at the end of the line or this will cause errors in our code.
Last thing we need to do is clean up the Game1 class go to it now. You can pretty much delete all the code we wrote in the last tutorial leaving only the code that was generated for us when we created the project. Up above the Game1 constructor just down form the spritebatch line add this line: "Map map;". Now skip down to the load content method still in the Game1 class. Once there add the following line.
Now skip down to the draw method and add these few lines of code.
And were finished. Save your project and press F5 to run. You should see something like this.
That's it. If you see something like this then is has worked.

If you spot any typos in this post or have any problems please let me know. I have included a link to the source of this project below.

SimpleTileEngineUpdated.zip

Sunday, September 16, 2012

Back To College and Stuff

It's September; the time of year when kids go back to school and I go back to college, for my last year actually. The good news is I got my Ordinary Degree; with a pretty decent GPA to boot, the highest in the class I'll have you know( I love to gloat about this as I was extremely average in secondary school).

Last year we were doing modules such as 3D game programming and game physics. All of these done with XNA. This year we have moved on to using unreal engine and the UDK. I'm really excited about using an industry standard engine and have big plans for it. I have also been looking in to the Unity engine in my spare time and plan a few things for it. Unity 4 is looking amazing as is Unreal engine 4. It's an exciting time to be a game developer.

So anyway expect to see some unreal engine stuff on here in the coming year.